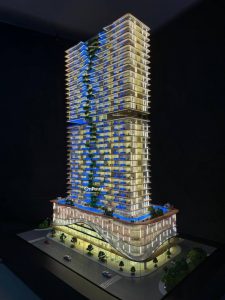
A Complete Overview Of The 3D Visualization Process For Beginners

3D visualization is used in various industries, such as architecture, gaming, and film production. It allows us to bring our ideas to life by creating realistic digital representations of objects, spaces, and animations.
As such, here is a complete overview of the 3D visualization process for beginners. We will cover the basic principles, tools, techniques, and applications of 3D visualization.
Making the base:
The first step of 3D visualization Dubai is to build the basic shape of your object. You use simple blocks and lines to create the frame. This part acts as the skeleton for everything else. It sets the size and height of the item. You need to be careful here because a strong base makes the rest of the work much easier for everyone.
Adding the skin:
Once the frame is ready, you need to add colors and patterns. This step gives the object its look and feel. You can make things look like wood, stone, or glass. Choosing the right colors makes the object stand out. It adds a layer of reality that catches the eye.
Setting the lights:
Light changes how we see everything in a room. You must place light sources in the right spots to create shadows. Shadows help us see depth and distance. Good lighting can make a cold room look warm and cozy. Without light, even the best models look flat and dull.
Picking the view:
The camera angle shows the viewer what to look at. You can pick a wide view to show a whole room or a close view for small details. The angle helps tell the story of the project. It guides the eye to the most important parts.
Doing the math:
This is the part where the computer works hard to finish the image. It calculates how light and color mix together. This can take some time based on how complex the scene is. You get to wait and see the final result appear on the screen. It is the bridge between the work and the final picture.
Final touches:
After the computer finishes, you might want to fix small details. You can tweak the brightness or fix a small spot. These tiny changes make the whole image look polished. It is the last step before you show your work to the world. Now your idea is ready to be shared with others.